|
|||||||


| عفشة السيارة عفشة السيارة تشمل أنظمة التعليق و التوجيه و نقل طاقة المحرك للعجلات |
 |
|
|
أدوات الموضوع |
|
|||||||
| عفشة السيارة عفشة السيارة تشمل أنظمة التعليق و التوجيه و نقل طاقة المحرك للعجلات |
|
|
|
أدوات الموضوع |
|
#1
 26-03-2009, 01:44 AM
|
|||
|
|||
|
خطوة بخطوة كيف تركب الكبالن بنفسك
هذا الموقع ممتاز يوضح بالصور والخطوات كيف تركب الكبالن بنفسك وبذلك تضمن ان التركيب سليم مائه في المائة.
http://www.clubprotege.com/wil/howto...AvwdGMB63QuNMJ www.clubprotege.com MazdaProtege.net :: How-to :: Change Right Axle <table width="780" border="0"> <tbody><tr> <td>
<object classid="clsid:D27CDB6E-AE6D-11cf-96B8-444553540000" codebase="http://download.macromedia.com/pub/shockwave/cabs/flash/swflash.cab#version=4,0,2 ,0" width="100" height="33"> </td> </tr> <tr> <td> <embed src="http://mazdaprotege.net/home.swf" base="" quality="high" pluginspage="http://www.macromedia.com/shockwave/download/index.cgi?P1_Prod_Version =ShockwaveFlash" type="application/x-shockwave-flash" bgcolor="#000000" width="100" height="33"> </object> <object classid="clsid:D27CDB6E-AE6D-11cf-96B8-444553540000" codebase="http://download.macromedia.com/pub/shockwave/cabs/flash/swflash.cab#version=4,0,2 ,0" width="100" height="33"> <embed src="http://mazdaprotege.net/about.swf" base="." quality="high" pluginspage="http://www.macromedia.com/shockwave/download/index.cgi?P1_Prod_Version =ShockwaveFlash" type="application/x-shockwave-flash" bgcolor="#000000" width="100" height="33"> </object><object classid="clsid:D27CDB6E-AE6D-11cf-96B8-444553540000" codebase="http://download.macromedia.com/pub/shockwave/cabs/flash/swflash.cab#version=4,0,2 ,0" width="100" height="33"> <embed src="http://mazdaprotege.net/modelinfo.swf" base="." quality="high" pluginspage="http://www.macromedia.com/shockwave/download/index.cgi?P1_Prod_Version =ShockwaveFlash" type="application/x-shockwave-flash" bgcolor="#000000" width="100" height="33"> </object><object classid="clsid:D27CDB6E-AE6D-11cf-96B8-444553540000" codebase="http://download.macromedia.com/pub/shockwave/cabs/flash/swflash.cab#version=4,0,2 ,0" width="100" height="33"> <embed src="http://mazdaprotege.net/modguide.swf" base="." quality="high" pluginspage="http://www.macromedia.com/shockwave/download/index.cgi?P1_Prod_Version =ShockwaveFlash" type="application/x-shockwave-flash" bgcolor="#000000" width="100" height="33"> </object><object classid="clsid:D27CDB6E-AE6D-11cf-96B8-444553540000" codebase="http://download.macromedia.com/pub/shockwave/cabs/flash/swflash.cab#version=4,0,2 ,0" width="100" height="33"> <embed src="http://mazdaprotege.net/ownersrides.swf" quality="high" pluginspage="http://www.macromedia.com/shockwave/download/index.cgi?P1_Prod_Version =ShockwaveFlash" type="application/x-shockwave-flash" bgcolor="#000000" width="100" height="33"> </object><object classid="clsid:D27CDB6E-AE6D-11cf-96B8-444553540000" codebase="http://download.macromedia.com/pub/shockwave/cabs/flash/swflash.cab#version=4,0,2 ,0" width="100" height="33"> <embed src="http://mazdaprotege.net/media.swf" quality="high" pluginspage="http://www.macromedia.com/shockwave/download/index.cgi?P1_Prod_Version =ShockwaveFlash" type="application/x-shockwave-flash" bgcolor="#000000" width="100" height="33"> </object> <object classid="clsid:D27CDB6E-AE6D-11cf-96B8-444553540000" codebase="http://download.macromedia.com/pub/shockwave/cabs/flash/swflash.cab#version=4,0,2 ,0" width="100" height="33"> <embed src="http://mazdaprotege.net/links.swf" base="." quality="high" pluginspage="http://www.macromedia.com/shockwave/download/index.cgi?P1_Prod_Version =ShockwaveFlash" type="application/x-shockwave-flash" bgcolor="#000000" width="100" height="33"> </object> </td> </tr> </tbody></table> <table width="740" border="0"> <tbody><tr> <td> <table width="400" align="left" bgcolor="#000000" border="3" bordercolor="#000000"> <tbody><tr> <td bordercolor="#000000" colspan="2" bgcolor="#333333"> Changing Passenger-side CV Joint (axle) </td> </tr> <tr> <td bordercolor="#000000" rowspan="2" width="193" bgcolor="#333333">Model Years: 1990-1998 w/DOHC 1.8L Engine DX models similar</td> <td bordercolor="#000000" width="187" bgcolor="#333333">Estimated Time: 1:30-3:00</td> </tr> <tr> <td bordercolor="#000000" width="187" bgcolor="#333333"> Cost of Parts Needed: $70-80 after core charge (remanu'd) </td> </tr> <tr> <td bordercolor="#000000" colspan="2" bgcolor="#333333">Symptom s of a bad axle:
[IMG]file:///C:/Documents%20and%20Setting s/XPPRESP3.USER/Desktop/tornboot.jpg[/IMG] Reason I replace this axle, small tear in the boot was leaking grease and making a slight clicking noise when I drive slowly or turn hard. </td> </tr> </tbody></table> <table width="300" align="right" bgcolor="#333333" border="0"> <tbody><tr> <td> Tools you will need: [IMG]file:///C:/Documents%20and%20Setting s/XPPRESP3.USER/Desktop/toolsyouneed.jpg[/IMG] Click the picture to see a spelled out version
<table width="740" bgcolor="#333333" border="1" bordercolor="#333333"> <tbody><tr bgcolor="#000000"> <td colspan="2">Installation Instructions:</td> </tr> <tr bgcolor="#000000"> <td width="82"> </td> <td width="642">1: Loosen Lugnuts with 21mm socket and breaker bar</td> </tr> <tr bgcolor="#000000"> <td width="82"> </td> <td width="642"> 2: Jack up vehicle with floorjack and properly lower onto jackstands </td> </tr> <tr bgcolor="#000000"> <td width="82"> </td> <td width="642">3: Remove lugnuts and remove wheel</td> </tr> <tr bgcolor="#000000"> <td width="82">[IMG]file:///C:/Documents%20and%20Setting s/XPPRESP3.USER/Desktop/unstakenut.jpg[/IMG]</td> <td width="642"> 4A: Using the hammer and the metal punch, unstake the driveaxle hub locknut so you can loosen it. </td> </tr> <tr bgcolor="#000000"> <td width="82">[IMG]file:///C:/Documents%20and%20Setting s/XPPRESP3.USER/Desktop/splashshield.jpg[/IMG]</td> <td width="642">4B: Remove the splash sheild. There are 6-7 10mm bolts that easily come off. This will allow you to take the entire axle out without damaging the splash shield</td> </tr> <tr bgcolor="#000000"> <td width="82">[IMG]file:///C:/Documents%20and%20Setting s/XPPRESP3.USER/Desktop/takenutoff.jpg[/IMG]</td> <td width="642"> 5: Use the wooden stick you have (i used a broken broomstick) to keep the wheel from turning while you hammer the axle nut off with the impact wrench. The reason to use wood is so you don't damage the lugnut studs. I found this out the hard way, using the breaker bar instead...i damaged the threads so now the lugnut is difficult to turn about half way down the stud. NOTE: It took me about 4 straight minutes of hammering the nut for it to come off. If you've never changed your axle before, over time the rust could have fused the nut to the threads of the axle. If you have a hard time getting it off, you could always use a jackhammer and split the nut off of the axle. Another way you could get the nut off would be to a quality breaker bar (such as craftsman with their lifetime warranty against breakage) and a 4' cheater pipe. Have an assistant hold down the brakes with the engine running (so you get power assist) and try to undo the bolt. The OEM specs for the torque of the nut are between 175 and 235 ft/lbs. of torque, which is why its such a pain in the ass to get off. </td> </tr> <tr bgcolor="#000000"> <td width="82">[IMG]file:///C:/Documents%20and%20Setting s/XPPRESP3.USER/Desktop/hubnutoff.jpg[/IMG]</td> <td width="642"> Driveaxle hub nut removed </td> </tr> <tr bgcolor="#000000"> <td width="82"> </td> <td width="642"> Now you need to be able to swing the hub away from the axle so you can remove the outer end of the axle. There are a couple approaches to this. Please follow steps 6- using the corresponding routes as describe below: Route A: I chose the easier route which required me to remove both 17mm strut bolts and nuts and the 12mm swaybar bushings. If you do this, you can pivot the entire hub on the balljoint. If your balljoint is worn like mine was, you risk tearing it like I did. Route B: The better route would be to remove the bottom 17mm strut bolt and loosen the upper one, undo the balljoint and perhaps even undo the Tie-rod end. This way you could pivot the hub on the top 17mm strut bolt and swing it away that way without risking damage to your tie rod end or ball joint. </td> </tr> <tr bgcolor="#000000"> <td width="82">[IMG]file:///C:/Documents%20and%20Setting s/XPPRESP3.USER/Desktop/swaybardisconnected.jpg[/IMG]</td> <td width="642">6A: Using the 12mm deep socket on the bottom and 12mm wrench on the top, unscrew the swaybar bushing bolt and remove the 4 bushings and bolt. This will allow the controlling arm to fall farther downward so you will have enough clearance to remove the axle from the hub.</td> </tr> <tr bgcolor="#000000"> <td width="82">[IMG]file:///C:/Documents%20and%20Setting s/XPPRESP3.USER/Desktop/brakelineclip.jpg[/IMG]</td> <td width="642">7A: Take the screwdriver and the hammer and gently tap the clip holding the brakeline to the strut out. It might be stubborn , and prying might also work, but be careful not to damage or bend the brake line too much</td> </tr> <tr bgcolor="#000000"> <td width="82">[IMG]file:///C:/Documents%20and%20Setting s/XPPRESP3.USER/Desktop/undostrutbolt.jpg[/IMG]</td> <td width="642">8A: Now with the 17mm socket and breaker bar on the right and 17mm wrench holding the other side, undo both bolts holding the strut to the hub assembly. You will probably have to hammer the bolts out. Be careful, the entire hub will come down and outward, and it will rest on the balljoint.</td> </tr> <tr bgcolor="#000000"> <td width="82"> </td> <td width="642">9A: Using the hammer, tap the axle so the splines pops out of the hub. You will need to bend the outer cv joint a practical 90 degrees to get it to come out of the hub. After you get it out, quickly prop the hub on something to keep it from tearing the balljoint cover (if it hasn't already)</td> </tr> <tr bgcolor="#000000"> <td width="82">[IMG]file:///C:/Documents%20and%20Setting s/XPPRESP3.USER/Desktop/balljointbolt.jpg[/IMG]</td> <td width="642">6B: Using the 14mm wrench and 14mm socket, undo the bolt pinching the balljoint to the hub assembly. After you get the bolt out, you will have to pry the balljoint apart from the assembly. (There is a special pry rod you can rent from various auto stores that will do this without damage) You could also try to hammer out the balljoint from above if you can get a good angle.</td> </tr> <tr bgcolor="#000000"> <td width="82">[IMG]file:///C:/Documents%20and%20Setting s/XPPRESP3.USER/Desktop/brakelineclip.jpg[/IMG]</td> <td width="642">7B1: Take the screwdriver and the hammer and gently tap the clip holding the brakeline to the strut out. It might be stubborn , and prying might also work, but be careful not to damage or bend the brake line too much</td> </tr> <tr bgcolor="#000000"> <td width="82">[IMG]file:///C:/Documents%20and%20Setting s/XPPRESP3.USER/Desktop/undostrutbolt.jpg[/IMG]</td> <td width="642">7B2: With the 17mm socket and breaker bar on the right and 17mm wrench holding the other end, remove the bottom strut bolt, and loosen the top strut bolt so the hub can pivot on it.</td> </tr> <tr bgcolor="#000000"> <td width="82"> </td> <td width="642">8B: If the Tie-rod wont' allow you to get enough clearance to take the axle out of the hub assembly, you can disconnect that as well. Using the hammer, take out the cotter pin holding the nut in place and loosen (do not remove) the 14mm nut on the bottom. After that, loosen the jam nut on the tie rod itself, and be sure to mark where it was. Using a prybar, pry the tie-rod end from the hub assembly. You might need a special tie-rod seperator tool. You can rent these from most auto parts stores </td> </tr> <tr bgcolor="#000000"> <td width="82"> </td> <td width="642">9B: Using the hammer, tap the axle so the splines pop out of the hub. You should be able to remove the rest of the outer end of the axle without a problem.</td> </tr> <tr bgcolor="#000000"> <td width="82">[IMG]file:///C:/Documents%20and%20Setting s/XPPRESP3.USER/Desktop/swingawayhub.jpg[/IMG]</td> <td width="642"> Now that you have the outer end out of the hub assembly, it is time to remove the axle from the joint shaft. The DX models do no have the joint shaft, they just have one long axle that goes straight into the transmission, but to reduce torque steer on the 1.8liter DOHC models, mazda uses a intermediate shaft or "joint shaft" to acheive this. The joint shaft goes into the transmission and is held up by a bracket. The axle then goes into the end where the bracket is. NOTE: You can NOT pull the axle shaft and expect it to seperate from the joint shaft. It is really in there and you will most likely need to remove the joint shaft and axle as one peice. </td> </tr> <tr bgcolor="#000000"> <td width="82"> </td> <td width="642">10: OPTIONAL STEP: Get under the car and locate the bracket and end of the axle. Using a hammer, try to beat the axle out of the joint shaft. If you are super lucky it will come out and you won't have to worry about any transmission fluid coming out, etc.</td> </tr> <tr bgcolor="#000000"> <td width="82"> </td> <td width="642"> If you find that you don't have enough clearance to be able to strike the axle hard enough, you will have to undo the bracket and pull the jointshaft with axle attached out of the transmission. </td> </tr> <tr bgcolor="#000000"> <td width="82">[IMG]file:///C:/Documents%20and%20Setting s/XPPRESP3.USER/Desktop/jointshaftbracket.jpg[/IMG]</td> <td width="642"> 11: Get under the car and locate the joint shaft bracket. You will need a 2" extension, 14mm socket and a short enough ratchet to get in there. The bolts are on there about 30-40 ft/lbs. so make sure you get a ratchet that is long enough, but not so long it won't let you ove it around (the ratchet i used was a standard 1/2" drive size.....it worked perfect). NOTE: This picture illustrates the approximate locations of the 3 14mm bolts </td> </tr> <tr bgcolor="#000000"> <td rowspan="2">[IMG]file:///C:/Documents%20and%20Setting s/XPPRESP3.USER/Desktop/popjointshaftout.jpg[/IMG]</td> <td width="642" height="112">12: After you remove the nuts, try to see if you can just pull the axle out of the transmission (have the drain pan in place, or you will make a mess). </td> </tr> <tr bgcolor="#000000"> <td width="642">13: The shaft will most likely not come completely out without a fight, so when you have it about this far out (see the picture), pry it with the pry bar against that outer ring. It should come out without much force. </td> </tr> <tr bgcolor="#000000"> <td width="82">[IMG]file:///C:/Documents%20and%20Setting s/XPPRESP3.USER/Desktop/transmissiondraining.jpg[/IMG]</td> <td width="642"> 14: Making sure the joint shaft bracket doesn't get caught up in anything....gently pull the jointshaft w/axle attached away from the transmission and out from the car. You don't want to screw up the joint shaft  . .Pictured: transmission fluid draining from transaxle </td> </tr> <tr bgcolor="#000000"> <td width="82">[IMG]file:///C:/Documents%20and%20Setting s/XPPRESP3.USER/Desktop/axleseperated.jpg[/IMG]</td> <td width="642">15: Now using the sledge hammer, and holding the axle's shaft with your legs, whack the axle towards you. It took me 3 good hard whacks to get it to seperate from the joint-shaft.</td> </tr> <tr bgcolor="#000000"> <td width="82">[IMG]file:///C:/Documents%20and%20Setting s/XPPRESP3.USER/Desktop/axlesepangle2.jpg[/IMG]</td> <td width="642">Close-up of the joint shaft and axle end</td> </tr> <tr bgcolor="#000000"> <td width="82">[IMG]file:///C:/Documents%20and%20Setting s/XPPRESP3.USER/Desktop/newaxleconnected.jpg[/IMG]</td> <td width="642">16: Grease up the inner axle end with some molybdenum based grease and insert it into the joint shaft. If you want to do it correctly, remove the old metal ring on the joint shaft splines and put on a new one (mine seemd fine, so i left it). Insert the joint shaft splines into the axle, it will likely not want to go in. If this is the case, prop up the joint shaft and axle vertically and, with the joint shaft at the bottom, strike the top of the axle with the hammer until it slides into the joint shaft all the way. Be careful to not screw up either splined end of the jointshaft / axle.</td> </tr> <tr bgcolor="#000000"> <td width="82">[IMG]file:///C:/Documents%20and%20Setting s/XPPRESP3.USER/Desktop/bracketdisconnected.jpg[/IMG]</td> <td width="642">17: Gently push the new axle and joint shaft back towards the transmission, be sure that the bracket is facing upwards so you can mount it back. </td> </tr> <tr bgcolor="#000000"> <td width="82"> </td> <td width="642">18: Insert the joint shaft into the transmission. It should just pop in if you move it up and down enough. If it is stubborn to go in, try gently tapping the bracket or axle end until it pops in (don't whack it hard or you could damage the transmission).</td> </tr> <tr bgcolor="#000000"> <td width="82">[IMG]file:///C:/Documents%20and%20Setting s/XPPRESP3.USER/Desktop/jointshaftbracket.jpg[/IMG]</td> <td width="642">19: Secure the joint-shaft bracket to the engine block with the 3 14mm bolts, and tighten them.</td> </tr> <tr bgcolor="#000000"> <td width="82">[IMG]file:///C:/Documents%20and%20Setting s/XPPRESP3.USER/Desktop/readytopopin.jpg[/IMG]</td> <td width="642">20: Get out from under the car. Grease up the other end of the axle with molybdenum based grease and insert it back into the hub assembly. </td> </tr> <tr bgcolor="#000000"> <td width="82"> </td> <td width="642">21A: Swing the hub assembly back into the strut and secure it with the 17mm bolts. Tighten them with the breaker bar and 17mm wrench</td> </tr> <tr bgcolor="#000000"> <td width="82"> </td> <td width="642">22A: Place the brakeline back into the strut and use the hammer to whack the clip back into place</td> </tr> <tr bgcolor="#000000"> <td width="82">[IMG]file:///C:/Documents%20and%20Setting s/XPPRESP3.USER/Desktop/swaybarbushings.jpg[/IMG]</td> <td width="642">23A: Place the swaybar bushings back onto the bolt correctly and put it through the swaybar. Secure it with the 12mm bolt using the 12mm deep socket and wrench. Don't overtighten or you could crack the bushings if they are old.</td> </tr> <tr bgcolor="#000000"> <td width="82"> </td> <td width="642">21B: Push the Balljoint back into the bottom of the hub assembly. You might have to strike it with the hammer to get it in all the way. Place the 14mm pinch bolt back into place to secure it.</td> </tr> <tr bgcolor="#000000"> <td width="82"> </td> <td width="642">22B: Hammer the tie rod end back into the hub assembly bracket and thread the 14mm nut back into place. Hammer the cotter pin back through it (you are supposed to replace it, but I didn't have any cotter pins handy) </td> </tr> <tr bgcolor="#000000"> <td width="82"> </td> <td width="642">23B: Put the lower 17mm bolt back through the strut and hub assembly and tighten both 17mm nuts with the socket, breaker bar and wrench. </td> </tr> <tr bgcolor="#000000"> <td width="82">[IMG]file:///C:/Documents%20and%20Setting s/XPPRESP3.USER/Desktop/popinside.jpg[/IMG]</td> <td width="642">24: Make sure the axle is pushed all the way through the hub, enough so the threads from the axle are exposed. Coat the threads with anti-seize and screw on the new driveaxle hub nut with your fingers</td> </tr> <tr bgcolor="#000000"> <td width="82"> </td> <td width="642">25: Using the impact wrench and 32mm socket, tighten the hub nut to 175-235 ft/lbs. of torque. </td> </tr> <tr bgcolor="#000000"> <td width="82">[IMG]file:///C:/Documents%20and%20Setting s/XPPRESP3.USER/Desktop/stakehubnut.jpg[/IMG]</td> <td width="642">26: Using a staking tool and hammer, stake the hub nut into the axle so it won't have a chance of moving</td> </tr> <tr bgcolor="#000000"> <td width="82">[IMG]file:///C:/Documents%20and%20Setting s/XPPRESP3.USER/Desktop/nutstaked.jpg[/IMG]</td> <td width="642">How it should look after you stake the hub nut</td> </tr> <tr bgcolor="#000000"> <td width="82"> </td> <td width="642">27: Refill transmission with fluid in draining pan, or with new fluid to the specified level on the speedometer gear.</td> </tr> <tr bgcolor="#000000"> <td width="82">[IMG]file:///C:/Documents%20and%20Setting s/XPPRESP3.USER/Desktop/axleinstalled.jpg[/IMG]</td> <td width="642">Your done!! Here is a couple angles of the axle installed!!</td> </tr> <tr bgcolor="#000000"> <td width="82">[IMG]file:///C:/Documents%20and%20Setting s/XPPRESP3.USER/Desktop/everythingback.jpg[/IMG]</td> <td width="642"> </td> </tr> </tbody></table> Copyright © 2003 ProjectMazda.com. All rights reserved. التعديل الأخير تم بواسطة almansour ; 26-03-2009 الساعة 02:27 AM سبب آخر: لست متأكد من نقل عنوان الموقع 
|
|
#4
28-03-2009, 11:11 AM
|
|||
|
|||
|
التعديل الأخير تم بواسطة almansour ; 28-03-2009 الساعة 11:15 AM سبب آخر: change site
|
|
#5
28-03-2009, 11:35 AM
|
||||
|
||||
|
ده محتوى الشرح فى الرابط الاخير
irst of all, sorry if the grammar is bad, english is not my native language. This tutorial is not ment to sound patronising – this is written for those of you with less experience working on cars. A big thanks to Richard Black – a briskodian who helped me with this and most of this tutorial are his words. It’s hard to say how much time this operation takes, for me it took a whole day, but most of the time went to wondering how to do this and photographing. The tools I used: 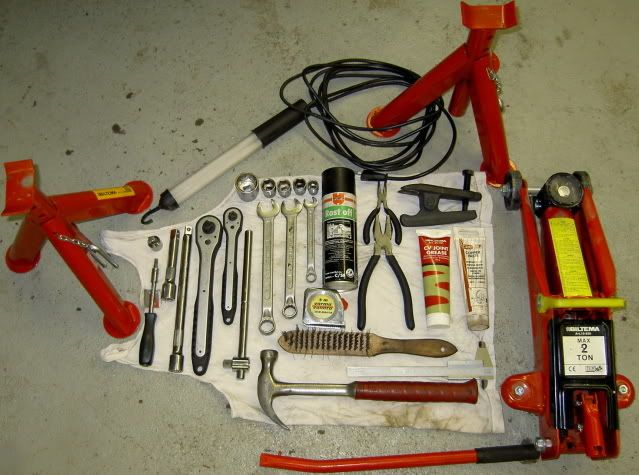 Including: Car jack and two stands, a work light, a chiselhead screwdriver, a couple of ratchet extensions and two ratchet wrenches, sockets (30, 19, 18, 17 and 14mm), fork wrenches (19,17 and12mm), a hammer, some measuring tools, a tie rod end separating tool, some lubrication and grease, a couple of pliers and a steelbrush. If possible include another 19mm fork wrench and a torque wrench to your tools, I had to do this without them. Off to work then! If you’re only replacing tie rod end, jump to #2 1. Undo the drive shaft nut Do this before jacking the car up and removing the wheel. Use the 30mm socket and loads of force! Mine was REALLY tight so I had to improvise a really long extension to get the nut loose. If you have access to pneumatic power tools, then use a boltgun to get this out. 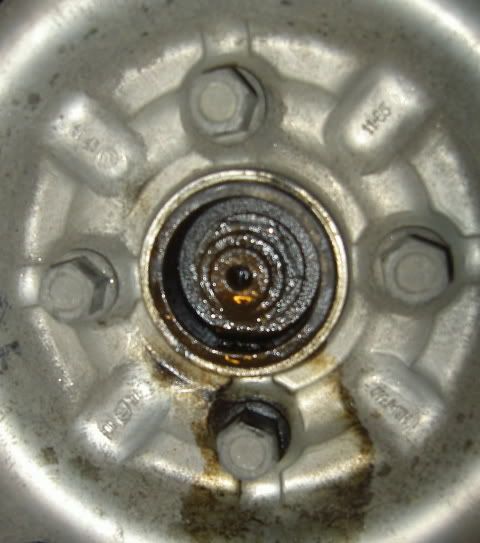 2. Jack the car up and put stands in place 3. Remove the wheel If you’re only replacing tie rod end, jump to #6 4. Take the brake caliber off Remove the two bolts that hold the brake caliber to the hub using the 14mm socket. Place the brake caliber on top of a box or something so the brakehose won’t be damaged. 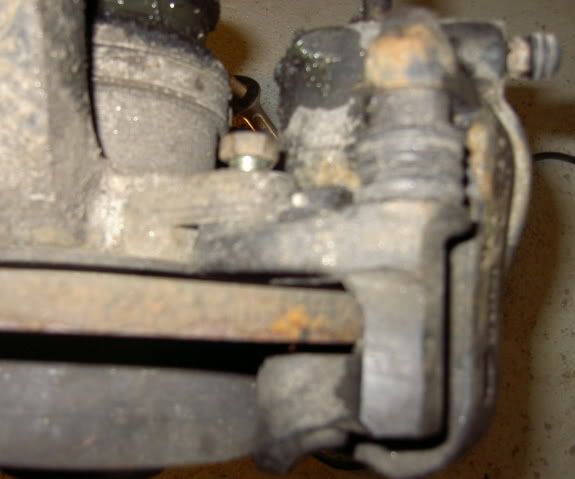 5. Take the brake disc off Use the chiselhead screwdriver and undo the screw holding the brake disc to the hub. The disc might be rusted in place so tap the disc with a hammer to get it off the hub.  6. Take the tie rod end apart Remove the pin that’s holding the nut using pliers. Undo the nut using the 18mm socket. 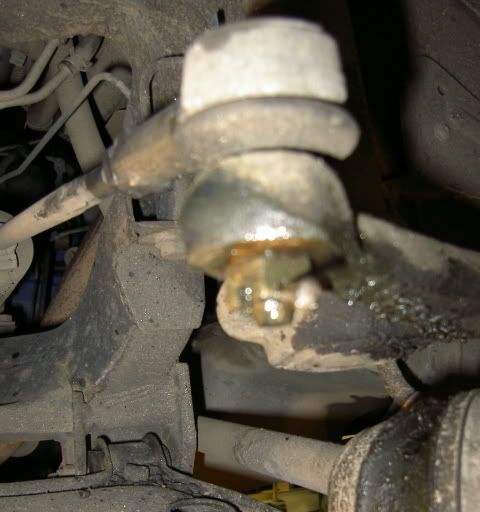 Take the tie rod end off using the tie rod end separator tool. If you don’t have the tool, you have to get it off using a hammer.  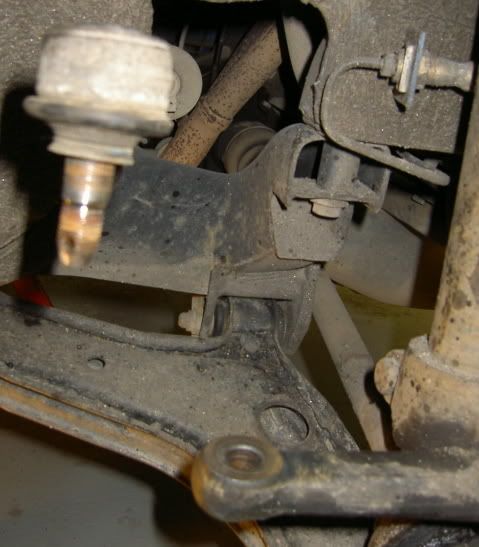 If you’re only replacing tie rod end, jump to #12 7. Take the bottom ball joint apart Take the cross-bolt off using the 17mm socket and the 17mm fork wrench 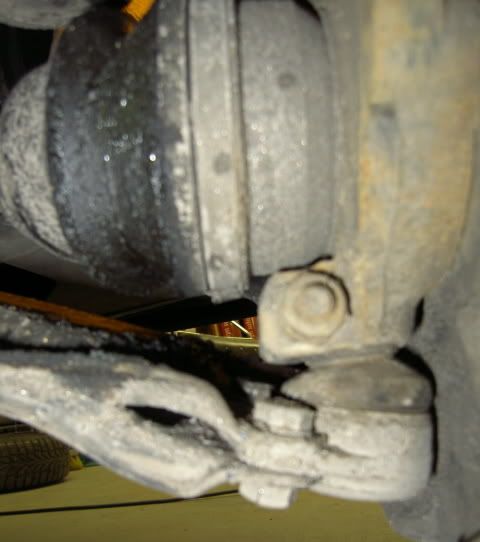 Then you have to push the bottom member downwards until the ball joint shaft disengages. There might be many ways to do this, I attached a steelpipe to the member with string then just pushed it down with my foot. Don’t use a lever, it might contact the ball joint gaiter and tear it.  8. Undo the CV joint In my case it came off pretty easy, just a tap with a hammer to the end to loosen it and then pull it out. If it’s stuck then you’ll have to hammer it all the way out, an old ½” ratchet extension comes in handy here. 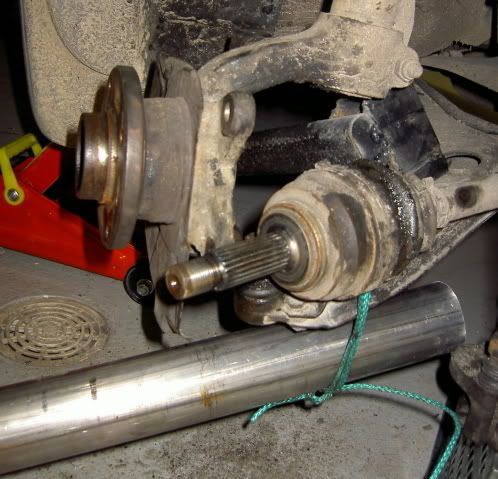 This next part is a bit tricky. If you wan’t to disengage the CV joint without taking it out of the gearbox, here’s how I did it: Place a vice (or the tie rod separator tool) to the drive shaft, then sit on the ground facing the hub. Push the vice towards the gearbox with your feet and pull the hub off the shaft with one hand. Tap the side of the joint with a hammer held in the other hand. It’s pretty tight and is held by a small circlip which will be done after you get the joint off the hub. 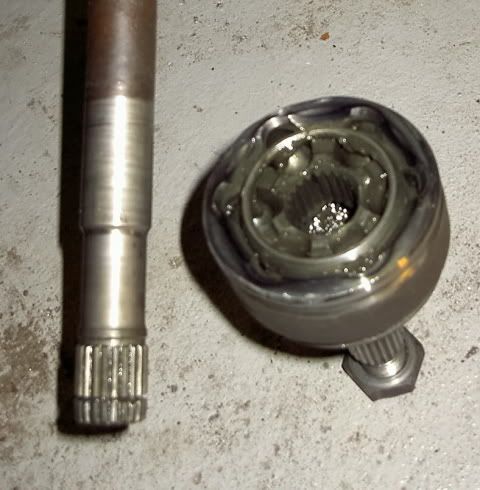 9. Replace the gaiter Take the old gaiter off the shaft and put the new one with clips in loosely.  Clean the shaft and the CV joint of the old grease and put in new. 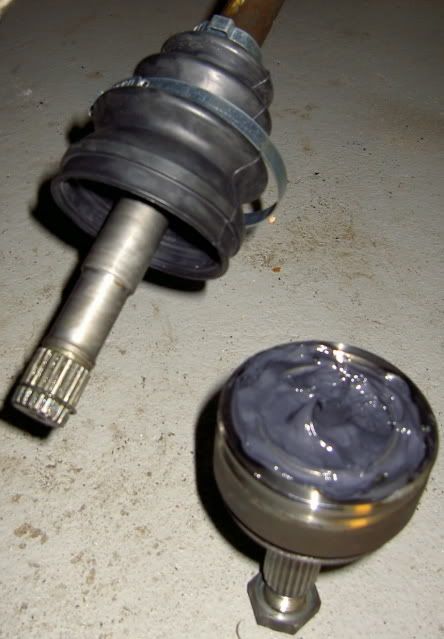 10. Mount the hub back to the shaft Fit the new circlip to the track on the shaft, then tap the hub back on the shaft. Fit the new gaiter to its place and tighten the clips using pliers. 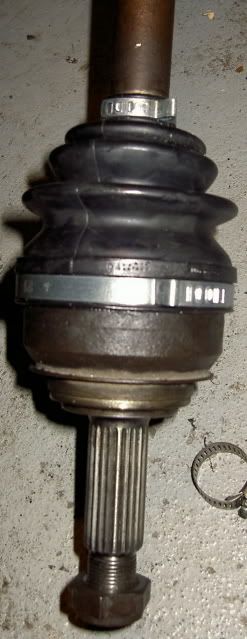 11. Put the CV joint back in place This is the reverse operation of #8, #7, #5 and #4. Be sure to tighten everything properly! 12. Replace the tie rod end First you should check if the new tie rod end is similar to the old one, the idea is to get the center of the ball joint to the same distance from the tie rod as the old one.  Take the nut that tightens the tie rod end loose using two 19mm fork wrenches and undo the old tie rod end. If the new tie rod end matches the old one just count the threads as you undo the old one and twist the new tie rod end exactly the same amount of rounds clockwise. Put the ball joint shaft back in place and tighten everything. 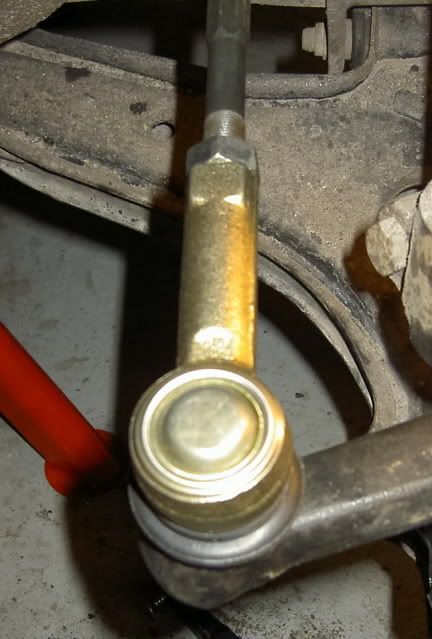 12. Put the wheel back on, drop the car down, refit the wheel hub nut and torque it as recommended (about 200ft-lb). 13. Adjusting toe Usually the toe is best to be checked after replacing tie rod ends. I got pretty good results just by measuring the the distance of the front and back of the front wheels. Move the car a few meters back and forward holding the steering wheel straight to get the wheels to settle. Then measure the distance from front wheel to front wheel on the front (Measure1) and on the back (Measure2) of the wheel. Compare. The front should be a few millimetres less than the back. If it needs adjusting, simply move the tie rod ends inwards if you have too much toe-in and outwards if you have too much toe-out. 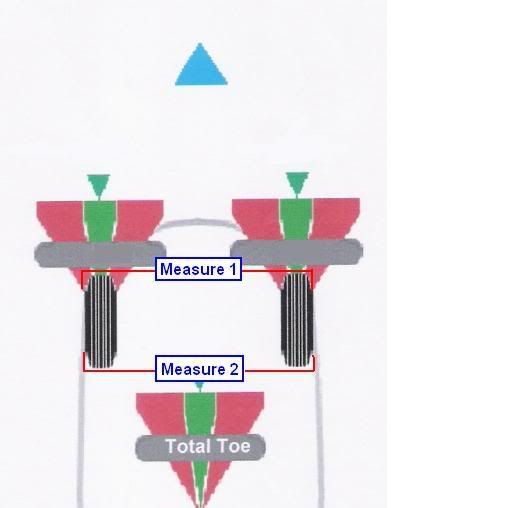 Hope this helps someone! Cheers, J-P from Finland
|
|
|
|